
Despite sending invoices via email, it’s also important to add a Download Invoice button to the Shopify customer account page. Emails are not 100% reliable – they can be lost, marked as spam, or not delivered. In that case, the customer first of all checks the customer account and will look for an option to download the invoice on the order details page. If we don’t want to get another unnecessary support ticket, email, or call, we have to be prepared for this.
The following instructions are for Shopify’s “Classic customer account”. We will use the Oxilayer PDF Invoice Generator app to achieve this goal. Shopify doesn’t have such an option by default, not even with the free Shopify Order Printer app.
Let’s assume that the Oxilayer PDF Invoice Generator app is installed. Follow these steps to add a “Download Invoice” button to the Shopify customer account.
1. Open the customer order details page in the theme editor
The app block only works on the customer’s account order details page. So, first, we need to open the Shopify theme editor and navigate to the order details page.
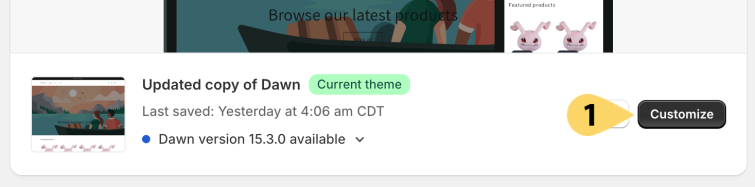
1. Go to Shopify admin > Online store > Themes
2. Then, click on the “Customize” (1) button for the current theme
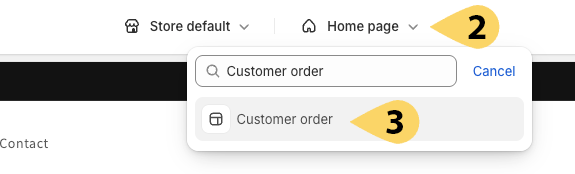
3. Click on the page list (2) and search for “Customer Order” (3)
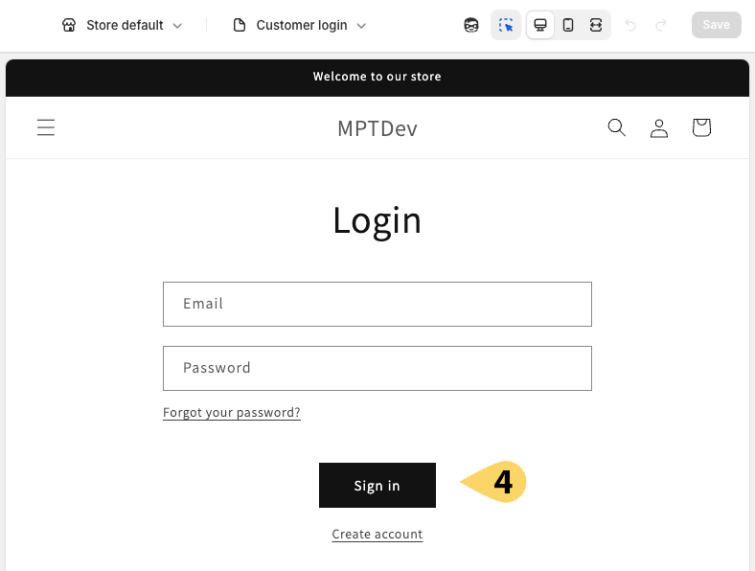
4. Log in to any customer account (4)
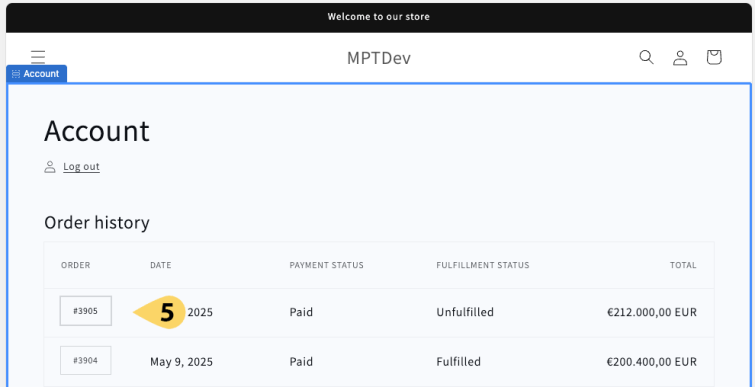
5. Click on any order to open the detailed page
Additional steps might be required depending on the theme, but the goal is the same: to open any order details page in the Shopify theme editor.
2. Enable the app block
To activate the app block, follow these three simple steps:
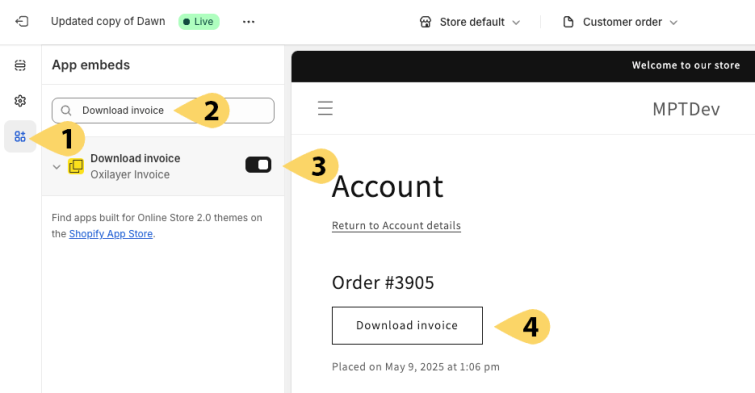
1. Click on the “App Embeds” icon (1)
2. Search for “Download Invoice” (2)
3. Enable the “Download invoice / Oxilayer Invoice” app block (3)
3. Insert the button in the correct position
If you see the “Download Invoice” button already and it’s in the correct position – super! You can skip this part of the article, unless you want to learn more about configuration options.
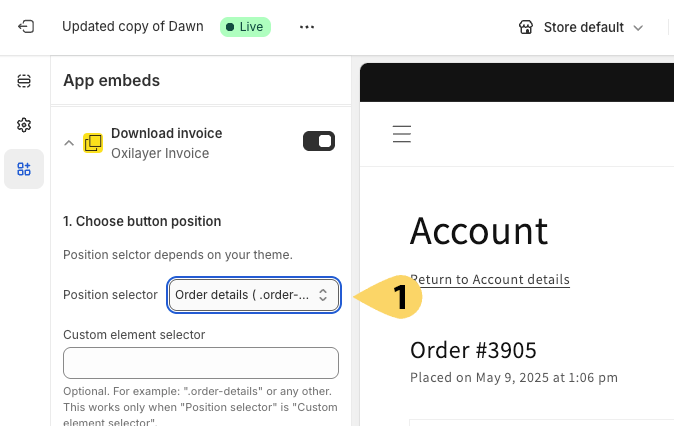
However, if the button wasn’t loaded after activation, you’ll need to change the “Position Selector” (1) option to find the correct position. This depends entirely on your theme, so try all available options.
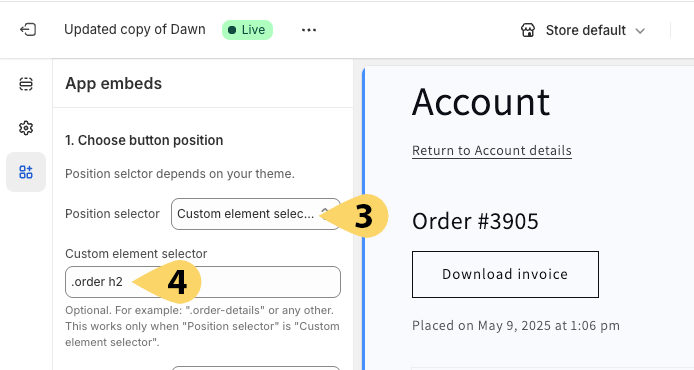
If the default positions don’t give the results you want, use the “Custom order selector”, or the “Placeholder” option. These are more flexible but require some knowledge. Feel free to contact Oxilayer support if you need assistance.
1. Custom element selector: Using this option, you can specify a custom selector in the “Custom element selector” (3) field. You can use selectors like: .order h2, h2, #order, etc. (4).
2. Placeholder: You can edit your theme code, likely in the main-order.liquid template file, to insert a placeholder where the button should be added. Use this placeholder code:
<span id="oxilayer_download_invoice_placeholder"></span>Additional position options
There are 3 additional options to help correct the “Download Invoice” button placement:
- Vertical position: The button can be added before, after, inside top, or inside bottom of the container element selected in the “Position selector” field.
- Horizontal position – This applies the CSS float attribute with the following values: left, center, or right.
- New line: This ensures the element will be placed on a new line. It adds the CSS attribute: clear: both.
4. Localizing the button
In the “Button label” field, you can rename or translate the button. However, if your store has more than one language, you will need the Shopify Translate & Adapt app. Follow these steps to translate the button label:
1. Go to Shopify Admin and open the Translate & Adapt app (1)
2. Click on “App Embeds” (2) under the Theme section.
3. Then click on Oxilayer Invoice – Download Invoice (3).
4. While changing the language at the top (4), you can translate the button label (5) into all available languages.
5. Style to match your theme
The app block offers multiple options to style the button. You can change the style and use it as a button or a simple link (1). If the style doesn’t match your theme, you can adjust the button colors (2) and margins (3).
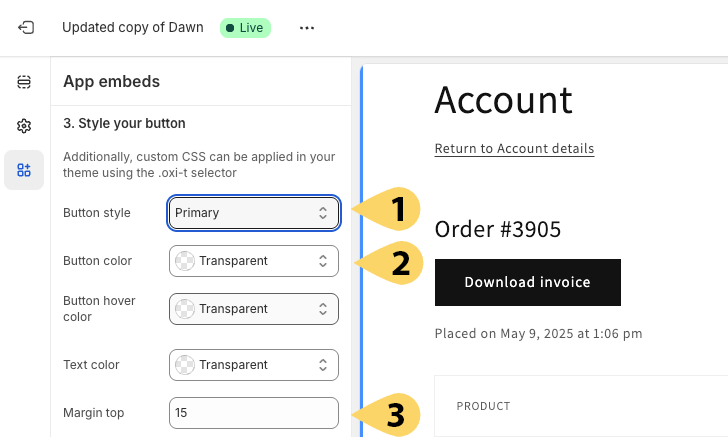
You can also use the .oxi-t CSS selector to apply custom CSS rules in your theme, allowing it to match perfectly with the style of your store.
Final word
It would be less complex if all themes had the same structure. However, it’s good to have such flexibility, the possibility to localize, and the ability to append styles to match your store, so it won’t look out of place.
Edwin